Streamer Fly Fishing - The Ulitmate Guide
Let's examine how to effectively fly fish streamers on a river and catch more fish!
Streamers are larger flies that you fish on an active retrieve. Since the fly is moving, fish will chase a streamer, and the strikes can be explosive! Everyone loves streamer fishing, but most anglers struggle to catch fish and give up quickly, usually blaming the weather, time of year, or other factors. In this article, I will share how I effectively fish streamers, helping you gain the confidence to put fish in the net!
Here are the basics:
Reading Water
What type of Streamers work, when and where
Line types - Floating, sinking, and Mono Lines
Mastering your retrieval and hook sets!
Reading Water
Since most anglers fish streamers in the winter, let's look at winter conditions first. Winter water levels are usually higher, faster, murkier, and colder than other months. In these conditions, fish sit and feed in different locations than at other times of the year. During winter, fish hang in slower water to use less energy. Slower water can be as apparent as frog water or the ends of tail outs. You can also find slower-moving water at the bottom of the river under faster-moving water, the edges or seams, and behind obstacles that slow the water down in faster-moving runs. These less apparent locations are "fishier" spots and tend to hold more active feeding trout.
In reading water, I usually start looking for the following:
Slow seams next to faster water, slow water behind rocks or obstacles, and anywhere else water slows down adjacent to faster-moving water
The deeper, slower water at the ends of the runs
Slow-moving frog water with structure
Slow seams are my favorite because they are usually places where fish will set up to feed, sitting in the slower water facing the faster-moving water while waiting for food to pass. You can effectively fish slow seams by casting into them, casting along them, or drifting into them. Recognizing the slow seam is easy, but how to place your streamer into these zones takes a little trial and error and is the "art" of streamer fishing this type of water.
The next location I look for is behind rocks or structures that slow the water down. Structures in a river will slow water down, making it a perfect spot for a fish to slip into and keep an eye out for passing food. Plan your presentations upriver and swing or strip your streamer on the edge of the slower pocket water. The key is to keep the streamer's presentation slow as it swims through the faster water adjacent to the slower holding water. The two best ways to slow the fly down are to keep it right on the edge of the seam or go deeper where the water is moving slower than the faster water above.
Deeper, slower water at the ends of the runs is the most common place to target fish, as the presentation is straightforward. Let the streamer sink, low and slow, and float downriver into the zone where you want to target the hunkered fish.
Slow-moving frog water with structure is where most novice streamer fly fishers start. This water looks the easiest to fish, but it's not. If you can't see the structure, seam, or rock, you are guessing with your presentation, hoping to find a feeding fish. I have caught countless fish in this water, but I have more confidence in fishing water that I can intently target. When I fish these areas, it's always after fishing the slow seams, rocks, or deeper slow-moving water at the ends of runs.
Now that we have examined winter conditions, let's consider how these conditions differ when the river is at its usual water temperatures, clarity, and optimal flows. Although the conditions have changed, I still target the slower seams next to faster water. The difference is the speed of water and the depth, but the concept of targeting an active-feeding fish remains the same. Throughout the year, 90 percent of my streamer fishing targets slow-moving pockets adjacent to fast-moving water.
Types of Streamers
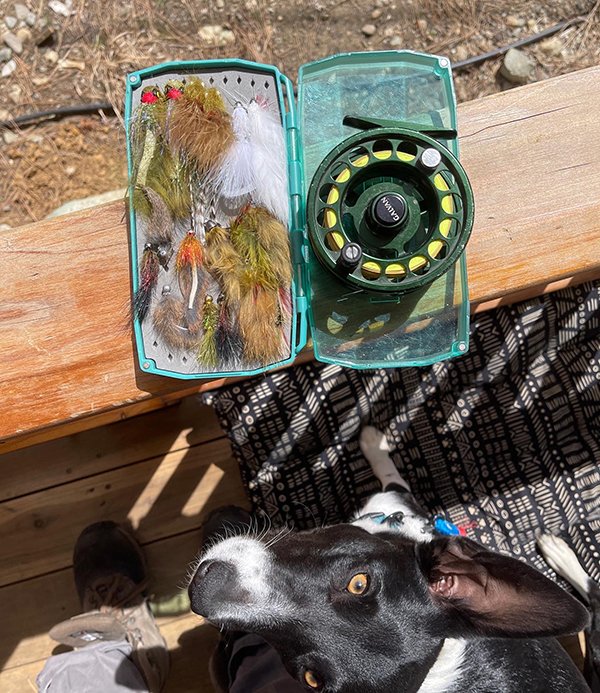
Finding the right fly for the river you are fishing can vary. In addition, there might be variations in your fly. Color, size, presentation speed, and depth coincide with time of year, water temperatures, and water clarity.
For example, I swing nonweighted wooly buggers in shallow pocket water in the warmer months while switching to weighted buggers to drop deeper into the water column in the colder months. As the water temperature changes, I also change the color of the streamers. During the heavy runoff or murky water, I fish other types of streamers that look more like bait fish, usually poachers and sculpin patterns. My advice is to keep it simple: gain confidence with a fly you know works from fishing reports or a local fly shop. From there, learn how to read the water and present the fly correctly before changing your fly selection.
Line Types
Let's look at the most common fly lines and break down the pros and cons of each.
Floating lines
Mono line and Euro Jigging
Sinking lines
Floating lines can be great when the water is less than eight feet deep. These lines allow you to control where your line sits on top of the water, helping you judge where your fly is under the water. A floating line also will enable you to navigate your drift around obstacles, giving you an advantage with your presentation. The downside to floating lines is that they float well! If you intend to get your streamer deep in a water column, using a sinking line or a mono line that cuts through the water will be an advantage. I change the depth of where I want my flight to be based on my leader's length. If I want my fly to be deep, I use 8 feet of leader instead of 5-6 feet in shallow water.
Mono lines have clear advantages and disadvantages. Casting or shooting the line is very effective, and it easily slices through the water column, getting your fly deep in seconds. The cast might seem odd to most fly fishers as you are not throwing a weighted fly line. You are casting a nonweighted line by throwing a weighted fly! The two main advantages to the mono line are that you do not need to backcast, and your line quickly cuts through the water, getting your streamer down deep fast. The last advantage to Mono is you can "Euro Jig" your streamers in the seams, keeping your presentation in the right location for longer.
Euro Jigging sounds fun, and the concept is simple. This style of fishing is highly effective! Euro Jigging only works on mono lines, similar to Euro Nymphing. The method uses a tight-line presentation throughout the run. The "Jiggin" part is where the magic is. As you tight-line your streamer, you jig it up and down slowly as it tracks downriver in a specific seam. The up-and-down jigging motion is similar to stripping a streamer, but the main advantage is that it STAYS in the seam rather than PASSING through the seam, keeping your streamer in the strike zone longer!
At the end of the drift, lower your rod tip and strip your streamer back to you; the tail out is just as fishy. The euro jigging method covers more water and keeps your fly in the zone longer than other presentations.
Sinking lines are complex, have various sink rates, and are hard to cast. They have a place on lakes, but once you add water hydraulics to the equation, I have more control over my presentation with a floating line or a mono line in most cases. I am not here to say that you should not or can't fish sinking lines on rivers, but in the freestone rivers I fish, I find sinking lines to be too cumbersome and not worth the effort.
The bottom line is that I confidently put fish in the net streamer fishing once I understood where my fly was and how to cover water effectively. Using a floating line or a mono line targeting specific water features provides insight into where my fly is and why it is there. This approach taught me to actively read the water, cast with intent, and present my streamers in more likely feeding locations.
Retrievals and Hook Sets!
This is the "art of streamer fishing." The retrieval is everything. Not too fast, not too slow. Is the water cold or warmer, deeper or faster? Are you stripping a leach or a baitfish? Ask yourself these questions while you are fishing! I like doing a few practice passes with the streamer right before my feet. This quick test will help you see what is going on with your streamer underwater and what that looks like as you fish it.
My go-to method is strip, strip, pause. Strip, strip, pause. I change the strip based on the water depth or temperature. If you want to slow things down, shorter strips are in order, or if you need to speed things up, stripping longer or faster pulls will do that. The key here is to read the water and adjust your stripping sequence to match your speed and intended presentation. During my strips, I also add some animation with my rod tip. Strip the line and flick the rod tip a bit. Swapping a strip for some rod movement mid-retrieval is a great way to add variation. Combining rod movements with strips elevates your retrievals from boring to boom! Believe in your retrieves. Consider what your fly is doing, and add some spice to attract fish. Think of it like teasing a cat with a long toy feather. A well-tied streamer has feathers and hackles that will pulse in the water with pauses, strips, and animations. It's up to you to create those "pulses" trout can't resist!
I keep my rod tip down in the water or close to it, keeping the fly low in the water while removing slack in the line. With my rod tip low, my strips are purposeful, and I have closer contact with my fly. When I get a tug back, I can "strip set" the hook and FISH ON!
Strip set? Yes. With the rod tip down, strip set the hook and put the fish on the line before you lift the rod. Doing so will ensure maximum hookset before putting the fish on the rod. Keeping your rod tip low will take some practice, but once you get the hang of it, your hook sets will be quicker and more robust, ensuring you keep that fish on the line. Where I fish in California, barbless hooks must be used in the winter, so a solid hook set and the correct tension are the keys to your success!
Here is a quick recap to get you on the water fishing streamers like a pro!
Floating lines work great in 2-8 feet of water, while mono and sinking lines are better for fishing deeper water.
Have confidence in your fly selection and have options that vary in color and weight.
Look for tailouts with walking-speed rapids that empty into a deep, slow-moving pool. Fish tend to hold towards the back end of the runs and on the seams of faster and slower water.
Look for hiding places such as buckets and shelves or behind obstacles.
When fishing for frog water, look for places that appear fishy or have fish activity. Are you seeing fish rise for dry flies? I look for water that is a little deeper, 4 feet plus, and water that shows signs that fish might be pooling up there.
Retrieval and Action! I like to pull 2 or 3 tugs on the line and give it 1-2 seconds, then pull a few tugs, then give it a few seconds. Add some rod movement to the mix. Pull the fly here and there. Be creative! Don't rush it, and find the grove and the speed.
Pick the right time of day or even the right day! Low-light or overcast stormy days tend to be better than bright, sunny overhead days.
If you are interested in learning more, diving deeper into the discussion, or want hands-on learning, book a guided trip, and let's elevate your streamer game!
We fish and guide year-round. During winter, we float clients down the river on our NRS Slipstream or AIRE Puma rafts. Our rafts keep you high and dry, make casting easy, cover miles of water, and put fish in the net!

